User Guide
This is complete user guide for Ewancoder / Effective&Easy Arch Linux installation script, getting it, configuring and executing. Jump to Configuration if you want some info upon ceal.sh file and setting script for your needs.
Where to get
You need to download 5 files from my dotfiles repo. There’s already a script for that, so just run
bash <(curl ewancoder.github.io/al.sh)
All this command does is runs via curl the al.sh script which downloads all five files in current directory:
- ceal.sh - constants eal, main configuration file
- install.sh - main file which you need to execute to start installation after editing ceal.sh
- eal.sh - the main script for installing base-system from live-cd
- heal.sh - host eal, for downloading and preparing live-cd itself from within working linux system
- peal.sh - post eal, for installing and configuring all software (running from within chroot after installing base-system)
Note
Script is using curl and not wget because Arch Linux live cd have curl as default and doesn’t have wget.
Alternatively, you can
- download al.sh and execute it manually
- download all 5 files by-hand
- clone my repository (but this is unnecessary and irrational for install purpose)
- download it as a zip archive
How to start
You only need to:
Format (and partition if needed) your drives
For example, use fdisk to partition your drives and mkfs.ext4 to format your partitions.
Configure the ceal.sh script (see Configuration section)
Start install.sh script (Just run
./install.sh)
EAL script reads ceal.sh file and then do all its magic based on constants which you should set first. The script is very flexible in terms of changeability and it’s going to be much more flexible and perfect with your help and feedback.
Warning
Do NOT try to execute script (install.sh) before you change ceal.sh constants. It have drives like /dev/sdb5 and users like ewancoder, so you probabbly want to change all the constants for your liking (or at least, partition your drives like this).
Configuration
This chapter is detailed description of the each variable withing the ceal.sh file.
1. Version
There’s nothing to configure. This variable shows current version of a script.
version="1.9.5 Error-Handled, 2014"
2. Error-handling
When there will an error occur within a script - you will be prompted with a question either you wish to repeat or to continue (skip the error). If for example you’re installing some packages with pacman and there’s an internet connection randomly goes down - you’re probably will want to repeat the command. It is the default action.
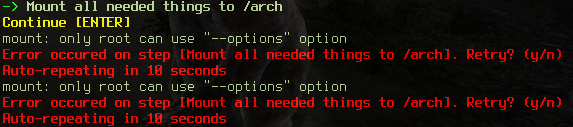
EAL script can do it automatically if an error was detected. This is useful if you’re installing script automatically (with auto switch turned on, see 4. Automatic install) and go for a walk at that time. You don’t want to go back and see that some random error taked place at the beginning of the script and did not proceed further, do you?
timeout=10
Set this variable to number of seconds after which the command will be executed again. Set it to 0 if you don’t want to use this feature.
Note
The error handling mechanism will print out on which step script was broken. This is achieved by using step variable inside mess function. Look further to dev in Stylization section.
3. Host system or live-cd
If you’d like to install Arch Linux from within your already working (arch) linux (but onto the other hdd/ssd partitions, of course) - this variables would do the trick.
Note
I am writing (arch) in brackets because I’m going to make it possible to install arch linux from within ANY distribution (it’s not as hard as it seems to be).
If you have live-cd, you can just reboot into it and run script without this feature. For that set hostinstall=0. Otherwise, installation process will go through downloading live-cd, chrooting into it and installing arch linux from within your working distro (this is pretty cool and you can do your work in the meantime).
hostinstall=1
Also you should check iso variable. It should be a working link to the root squashfs live-cd image. It is working now, so you could just leave it alone.
iso=http://ftp.byfly.by/pub/archlinux/iso/2014.06.01/arch/x86_64/root-image.fs.sfs
4. Automatic install
If you want to monitor EACH step of the script and give your permission to do it, leave auto=0 as 0. If you want script to do all automatically so you could do your other work in the meantime - set auto=1. Anyway, there’s cool error handling system (see 2. Error-handling) which will stop the script if something goes wrong. But by using first option you can see what actually going on and learn how script works, so for the first time leave it as 0.
auto=0
Be AWARE: If you change auto to 1, all installation process will go as fast as your computer could think, download files and install packages. And this is pretty awesome when you just want to install your system and do your other stuff in the meantime :)
5. Font and locales
As archwiki tells us, we should set console fonts for displaying some character (for example, for russian utf-8 fonts it’s cyr-sun16).
font=cyr-sun16
And, as well, we need our locales set in bash array.
locale=( en_US.UTF-8 ru_RU.UTF-8 )
Just list all locales you want to include separated by whitespace like in the example.
Note
If you need only one value in a bash array, you can always remove brackets and make it a variable like this: locale=en_US.UTF-8.
6. Hostname and timezone
This is the hostname of your PC and your timezone. Hostname is the name of your PC, you should make it yourself. Timezone is linked file which is located at the /usr/share/zoneinfo folder.
hostname=ewanhost
timezone=Europe/Minsk
7. Mirrorlist
Mirrorlist is formed by using grep from /etc/pacman.d/mirrorlist file on live-cd. So just include all countries’ names respectively to importance. For example, here Belarus goes first, then all other countries. And United stays both for United States and for United Kingdom.
mirror=( Belarus Denmark Russia United France )
8. Internet configuration
Internet can be configured 2 ways:
- dhcpcd - the most easiest way. It does not require any configuration and runs out of box because it is dhcp receiver. Although, dhcp server should be set on your router and you should have ethernet connection (I’ve not experienced wi-fi connection over dhcpcd, although it is possible)
- netctl - powerful and easy-to-setup network manager which is stable, ensures good connection over any interfaces with any settings and contains lots of pre-configured profiles as examples
netctl=1
If you set netctl=0 - you will use dhcpcd service. Otherwise - you should set all other params that you need to use netctl.
profile=wireless-wpa-static
Profile is one of the profiles in /etc/netctl/examples folder which will be copied and edited by sed based on your config values. You can choose ethernet-dhcp, ethernet-static, wireless-open, wireless-wpa-static, etc.
Note
I am currently using wireless-wpa-static because my Raspberry PI needs my ethernet cable.
Warning
WPA profiles need wpa_supplicant package which handles wpa encryption. So make sure you have one in software section below (see 13. Software list)
Next, you should definitely configure network interface. You could run ip link command to know which interfaces do you have. It’s going to be something like enp2s0 or wlp3s5. Mine is wlan just because I have applied special rules to udev.
interface=wlan
If you’re using static ip address (alongside with static netctl profile), you should definitely setup ip. Also you need to setup dns and gateway to be able to connect to your router.
ip=192.168.100.22
dns=192.168.100.1
Note
With netctl dns is not a network dns, it’s address of your router (because you connect to it firstly).
Warning
In my current configuration dns and gateway are the same, so I made them as one variable - dns. If you have different dns&gateway, you can connect me and I’ll improve my script a little bit more.
If you’re connecting via wi-fi (and maybe using encryption) you will need ESSID & PassKey to connect to your access point. There are easily set up here too.
essid=TTT
key=192837465
9. Devices
EAL script does NOT format your drives. You should do it youself (preferably with mkfs.ext4 command). Then you can configure these drives in ceal.sh to automount them and add to fstab during install.
All variables are arrays with corresponding values. For examle
device=( /dev/sdb5 /dev/sdb6 )
mount=( / /home )
This means that /dev/sdb5 will be mounted to / and /dev/sdb6 will be mounted to /home.
All devices should be set in the order of mounting. /home could not go before /. The first and mandatory device is / - root.
Description is just text description of the mounted drive. I have 4 devices mounted in my system: root, home, cloud and backup.
description=( Root Home Cloud Backup )
Device & mount are the actual devices and their mount points.
device=( /dev/sdb5 /dev/sdb6 /dev/sdb4 /dev/sda5 )
mount=( / /home /mnt/cloud /mnt/backup )
Type, option, dump and pass are the options in the fstab file. Pass should be 1 for root partition and 2 for all other. Dump is usually 0 for all of them.
type=( ext4 ext4 ext4 ext4 )
option=( rw,relatime,discard rw,relatime,discard rw,relatime,discard rw,relatime )
dump=( 0 0 0 0 )
pass=( 1 2 2 2 )
Warning
Discard option is used only for SSD to minimize wear leveling count, do not try to use it on HDD.
And we need to set some additional devices. First - we need to point out which device will be used to store grub bootloader. It is usually your drive where root partition is located.
mbr=/dev/sdb
If you have Windows OS installed on your machine and you want to automatically copy all fonts from c:\windows\fonts to /usr/share/fonts/winfonts, set windows to your windows partition. Otherwise just delete this option (or set it to “”).
windows=/dev/sdb1
10. Users configuration
Now you need to configure users.
user=( ewancoder lft )
So, users is our usernames declared in bash array.
Note
I have two users: ewancoder (my primary user) and lft (linux future tools, for testing weird stuff).
Shell variable is array with shells which will be set to users correspondingly. If not set, it will stay as standard (bash).
shell=( /bin/zsh /bin/zsh )
Group is a variable with groups which will be added to corresponding user.
group=( fuse,lock,uucp,tty fuse )
Groups itself divided by comma. For example, fuse, lock, uucp and tty groups added to ewancoder user, and only one fuse group added to lft user.
Main variable is needed only as reference.
main=${user[0]}
It serves just as a reference to ewancoder string. So you can just simply change ewancoder to yourname and all other stuff in the script which needs your username will be changed to yourname.
You can also set main to second user like main=${user[1]}. Array elements in bash start from 0.
For each user will be created an entry in sudoers file which will allow to use sudo for that user. If you want to add some additional entries in sudoers file (for example, for executing something without password prompt) you can add this additional entry to sudoers array. I have 1 entry there which allows me to update system without password prompt.
sudoers=( "$main ALL=(ALL) NOPASSWD: /usr/bin/yaourt -Syua --noconfirm" )
11. Executable commands
If you have complex arch linux ecosystem, you definitely want to execute some of your specific commands at the end of installation process. This is handled by execs and rootexec variables.
If you want to execute some commands after installation process as root, just add a line with a command in a rootexec array. Each line will be executed consecutively after all installation process and even after user commands will be executed (look below).
Note
You can define bash array elements not only horizontally like array=( item1 item2 ) but also vertically, like
array=(
   item1
   item2
)
This comes in handy when you have lots of big commands to execute and also want a pretty code.
User commands is something like rootexec array, but they are executed as corresponding user. For example, if you want to execute “mkdir ~/lol” as your first user and “vim +BundleInstall +qall” as your second user, form an array execs like this:
execs=(
   "mkdir ~/lol"
   "vim +BundleInstall +qall"
)
What if you want to give specific user a bunch of commands to execute? It’s easy: add a linebreak at the and of a line and array parser will take your command as a little script:
execs=(
   "mkdir ~/lol \n
   yoursecondcommand \n
   yourthirdcommand"
   "vim +BundleInstall +qall")
Look precisely that \n (which is stands for new line) is at the end of the each line except last one. And all three line enclosed in quotation marks as one big line.
Note
You can use even something like execs=( "command1\n command2\n command3\n" ) but that would not be pretty.
There’s an example:
12. Git configuration
If you’re not familiar with the git and github you can totally remove git section from configuration file, although this script is highly integrated with git dotfiles technique, so you will benefit much much more by making your own dotfiles repo and fulling it with your unique software configuration.
If you’re just familiar with git and github but don’t have a dotfiles repository, you can automatically clone your favourite github repositories whenever you want and even link all the content from these repos to whenever you want (for this, read below).
And finally, if you already have your dotfiles repo and you want to download it automatically and setup your software by symlinks, you can set it up pretty quickly and easy.
First, of course, we need to setup our git essential settings:
gitname=$main
gitemail=$main@gmail.com
gittool=vimdiff
giteditor=vim
You can refer these settings to any of your usernames (if you have universal name on the web like I do) or just set something like gitname=mygitname within the script. These settings will be applied to specific user. I need these settings only for one user, but you always can do like
gitname=( firstgituser nextgituser thirdgituser )
gitemail=( email1@gmail.com email2@yandex.ru email1@gmail.com )
gittool=( vimdiff vimdiff vimdiff )
giteditor=( vi vim nano )
Next goes git repositories setup. As we did with our user variable (see 10. Users configuration), all these variables are set corresponding to each other. We have 5 variables:
- gitrepo - list of our repos in a form “user/repo” (like vundle does)
- gitfolder - folder in which you want to clone this repo
- gitrule - chown rule to apply
- gitmodule - submodules to pull
- gitlink - where to symlink all repo content
gitrepo=( $main/dotfiles $main/etc $main/btp $main/eal )
gitfolder=( /home/$main/.dotfiles /etc/.dotfiles /home/$main/btp /home/$main/eal )
gitrule=( $main:users '' $main:users $main:users )
gitmodule=( ".oh-my-zsh .vim/bundle/vundle" )
gitlink=( /home/$main /etc )
Lets discuss this on an example above.
First, we’re cloning git repository https://github.com/ewancoder/dotfiles.git to folder /home/ewancoder/.dotfiles. We’re doing this as root, so all the files will be read-only for any regular user.
Next, we’re pulling two submodules that I have in my dotfiles repo - oh-my-zsh and vundle. All submodules for one user divided by a space and enclosed in quotation marks for division with other users.
After that, we’re ready to change all files permissions to whatever you need. In the example we’re performing chown ewancoder:users -R /home/ewancoder/.dotfiles - giving power to the $main (ewancoder) user.
And now is the most interesting part. If you actually have your dotfiles repository and it contains perfect directory hierarchy to match your home folder (or /etc folder, or any folder you want), for example if your dotfiles contains .config/mc/ini file for configuring mc and not just ini file, then you can set gitlink variable to your home directory (or any) so that all content from repo will be symlinked to home directory.
Note
Even if you home directory would have some folders/files which you dotfiles repository has, it is not a problem at all. All files from home will be firstly moved to dotfiles repository, and then dotfiles repository will be linked. So you should set your gitignore to * to exclude lots of untracked content.
13. Software list
Finally, you need to configure your unique pieces of software. At first, it maybe seems hard to list all the software you use, but when you’d construct your own list of software - it’d be an easy thing to add or to delete something from the list. And you’ll be perfectly aware of the software you use.
There we have 3 variables:
- softtitle
- software
- service
Softtitle and software are set correspondingly to each other: first value of softtitle is just caption for the first software value.
Now, software contains just list of the packages, installed by yaourt (this is analog of pacman, but it installs AUR packages too). You can list them like software="python cron anki ..." or you can divide them into groups like software=( "first group" "second group" ... ). If you’re using second approach, you’d wanna setup some labels on that groups so you can see what you’re currently installing: this is softtitle variable’s responsibility.
You can see an example:
    #Titles shows during install
    softtitle=(
        Drivers
        Audio
        Core
        Styling
        Web
        Office
        Coding
        Tools
    )
    #Essential AUR software, installed before system boot
    buildbefore=( canto-next-git compton cv dmenu2 dropbox dunst-git gtk-theme-espresso gcalcli gxkb slimlock-git slim-archlinux-solarized-spiral wmii-hg )
    #Long-builded AUR software, installed after system boot
    buildafter=( canto-curses-git chromium-pepper-flash hyphen-ru hunspell-ru jmtpfs latex-beamer latex-pscyr pencil popcorntime-bin python-pygame-hg syncplay pasystray-git )
    term="urxvt -e" #Terminal to install $buildafter software within
    #Packages (set drivers first for no-conflict)
    software=(
        "lib32-nvidia-libgl mesa nvidia nvidia-libgl phonon-qt5-gstreamer ttf-dejavu"
        "alsa-plugins alsa-utils lib32-alsa-plugins lib32-libpulse pulseaudio pulseaudio-alsa"
        "cronie devilspie udevil feh fuse git gksu keychain libnotify mplayer openssh p7zip pygtk redshift rsync rxvt-unicode screen sshfs tig tilda transset-df unrar unclutter unzip urxvt-perls wpa_supplicant xclip xdotool xorg-server xorg-server-utils xorg-xinit zsh"
        "faience-icon-theme ffmpegthumbnailer terminus-font tumbler"
        "chromium deluge jre8-openjdk icedtea-web net-tools skype"
        "anki calligra-krita filelight geeqie gource gvim impressive kdegraphics-okular libreoffice-fresh hyphen hyphen-en hunspell hunspell-en mc scrot thunar vlc"
        "ctags mono pygmentize python python-matplotlib python-numpy python-pyserial python-requests python-scipy python-sphinx python2-pygments texlive-core texlive-humanities texlive-langcyrillic texlive-latexextra texlive-pictures texlive-science wine"
        "dosfstools encfs gparted ntfs-3g smartmontools thefuck virtualbox"
    )
Warning
If you’re using first approach, it is usually safe to include software without any order. But if you’re using second approach - set drivers software before any other software (look where I’ve put my mesa, nvidia, nvidia-libgl packages). Because if you wont, there likely to happen a conflict: some software package can require mesa OR mesa-libgl, it can choose to install mesa-libgl, and when you’re installing mesa in the next chapter - BOOM. It’s a conflict.
Finally, we’ve come to the last variable - service. Here you can setup services which will be enabled after whole software installation process.
service=( cronie deluged deluge-web )
14. The rest
Interface secrion in the ceal.sh file is not changeable although you can change something there to make different stylization. This section is only responsible for the mess function (which is responsible for displaying current states on the screen, mess = message) and for the stylization of the script (green, red, yellow text, pauses and etc).
This chapter is about configuration so I will not discuss stylization here, although you might wanna check Stylization page to get some more technical information about stylization.
Troubleshooting
If you have encountered an error and could not solve it by just skipping or repeating, instead of typing (y/n) type givemebash command. It will give you bash session and you then can do whatever you want. After fixing the error, please report me about it and exit bash to continue installation (after bash exit command you will be returned to the script again).